I have previously mentioned “bracketing”. Read any good photographic book and you will also read the word “bracketing”. Bracketing has saved my professional standing on more than one occasion.
First off, let’s define bracketing. This is taking the same subject three times with three different settings. Basically, more light than you imagine is needed, the correct amount of light, and finally, less light than you imagine.
With modern cameras being so good, almost intuitive if you read the publicity blurb (hint: don’t read the blurb, but do read the manual), then why should bracketing still be necessary?
Now I do not really care how you gage the “correct” setting, whether you get it from the camera’s built-in light meter, or from a hand held light meter, or even if you used the photojournalist’s creed of f 8 and be there, the important factor is just that you do have a ‘starting point’ to work from.
I am also aware that most cameras these days do have a good metering system, taking readings from various points in the viewfinder and working out a good average, but you must remember that all the camera can do, is give you a ‘good average’. This does not mean that it is the ‘best’ exposure.
There is much in the literature too about how good digital cameras are in problematical light situations. Surely the digital range is enough to get you out of trouble, under any situation? Simple answer is, No. If you are looking for a really good final image, you have to give the camera as close as you can to the ideal exposure for that picture. There are limits in how far you can go away from the ideal.
What I am preaching here is that you should always try for excellence in your photographs. Do not think that if there is not enough light, then you can fix it all with Photoshop or other fancy computer technology. You can’t. It will end up as a trade-off between detail, brightness and contrast. And nothing beats correct exposure in the first place.
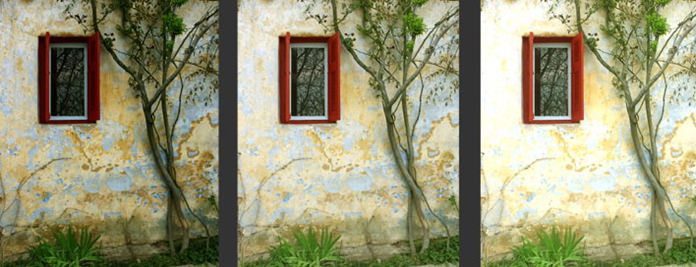
So we return to bracketing, one of the oldest methods of getting a properly exposed photograph, and still significant in the digital age. As stated above, you have to have a starting point, and what you have to do is to decide just what is the main element in the photograph you wish to take. Is it the person, or is it the countryside, or is it sunflowers, or the building such as the photographs with this week’s column? Having decided on the main element try and get a light meter reading from it. Even walk up close so that the main element fills the viewing screen and get your initial light meter reading exposure values. This is the starting point, so set your camera to the values indicated. Such and such f stop at so and so shutter speed. If you have metered correctly, then you will get an image that is close to perfect. But only “close”. To get that perfect exposure, now you bracket.
The easy way is to take two more shots, one set at half a stop “under” exposed and the other at half a stop “over” exposed. Now you can do this easiest by changing the f stop (aperture) by half a stop, as most lenses have the half stop increments, while the camera has full stops with the shutter speeds.
The three shots shown here were bracketed with the half an f stop increments, as it is always very difficult to estimate bright exposures. As you can see, the one in the first is probably best, though the brightest one is also acceptable. The dark one is throw away value only!
Next time you are trying something just a little tricky – remember to bracket the exposure!
 |
 |
 |


