Photography has something for everyone. Pensioners can take great photos, and so can youngsters. What I am doing today is to try and make sure you get even better photos.
Fancy cameras are not needed, good technique is. The following tips will help you get the most out of your investment. Of course you should remember that point and shoot varieties have limitations and SLR’s have advantages! The two types of cameras have their different capabilities, and you must stick within the parameters.
The first tip is one that I give to everyone at least once a year. “Walk several meters closer”! More good shots are ruined by having the subject as small dots in some huge background. Make the subject the hero. If the subject(s) are people, then use the telephoto setting and still walk in closer. Fill the frame with the subject and you do not need to worry about the backgrounds. Ever!
Another easy procedure is to use filters to warm up the scene, or polarize and add some intense color to the photo. “But my point and shoot digital doesn’t take filters,” I hear you say. Sure, but the lens is physically so small, it is easy to place something before it. Even various colored sunglasses can both polarize and add warmth to the shot. You may want to put the camera on a tripod, while you hold the sunglasses directly over the lens. There are small ‘mini’ tripods you can use, which retail for around B. 200 and do the job admirably. By the way, the polarizing effect is most noticeable when you are shooting “with” the light, rather than into it.
When taking portraits outdoors, turn the flash on as well. The camera will have set itself to expose the darkest part of the scene, so the flash then brightens up the foreground subject.
Another trick to outdoors portraiture is to take some shots with the sun behind the subject to ‘rim light’ the hair with the halo effect. With the sun behind the subject, you also stop the screwed up eyes from the sun’s glare, which is never very photogenic.
You should also explore your camera’s capabilities. A notebook will also help you so get one. Try different settings and see what the end result can be, but remember what the settings were by noting them in your notebook, if you want to repeat the effect!
One setting that most digital cameras possess is a ‘macro’ mode. Use this to discover new and exciting details in your garden. The macro mode is usually depicted as a flower in your on-screen menu. Remember that to get the best macro shots, look carefully at which part of the subject will be in focus. The depth of field in macro is very shallow, so note where the camera magic eye is indicating the focus point is, relative to the subject, before slowly pressing the shutter release.
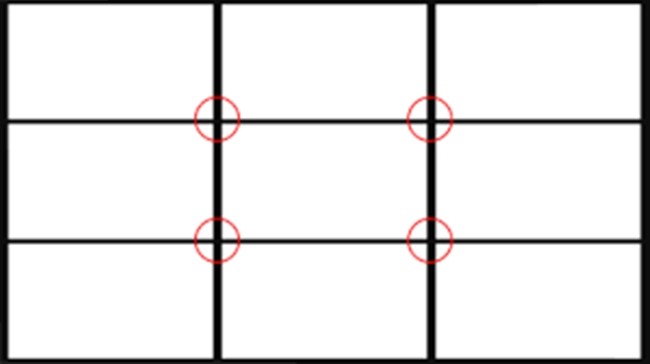
Another very simple tip, but one that seems to be forgotten is the placement of the horizon line, which should be one third down from the top of the LCD screen, or one third up from the bottom of the screen. The horizon line (as the name suggests) should also be horizontal! Now place the image one third in from either side. This is the Rule of Thirds.
Another tip is to buy another memory card. The one you will get with the camera is too small. Buy a 4GB card and use the highest resolution you can. This way, if you do have a great shot, you can have it enlarged, and still be sharp. Another advantage of having two cards is you never end up with a full card and another great shot to be taken. I set my camera on 200 ASA for 90 percent of the time.
It should be remembered that when you bought this new camera because it had plenty of megapixels, unless you run the camera at its highest resolution, all the expense of the additional megapixel capability has been wasted. You got a 24 megapixel camera, rather than an old 12 megapixel for that reason! So enjoy your camera, this weekend.
 |
 |
 |


