There have been some spectacular sunsets recently. Brilliant orange skies which are just aching to be photographed. However, there are a few tricks to getting good sky shots.
The sky is one subject that we tend to overlook, or even forget about entirely. This is a mistake, as the sky is the main light source for all outdoors photography. Think about it – it is the sky that lights the landscape, not the sun! Yet we take the exposure readings from the ground, rather than the light source.
This fact alone gives the photographer more control over the end result. Look at landscapes you have taken before and note just how the sky was “blown out” compared to the landscape. There is a big difference between the sky (the light source) and the landscape (the reflected light source). This is why it is difficult to match to two, but you can get over this problem.
One way to give your sky and clouds more definition is by using a polarizing filter. These polarizing filters reduce glare in the atmosphere. This will give your clouds a more defined outline. At first, you will notice that your entire image is much darker. That is because polarizing filters reduce the amount of light that enters your camera. This can be a good thing or a bad thing, depending on what you are photographing. When water makes up most of the scene, polarizers are perfect. When there isn’t much water present, you may need to reconsider.
However, although you get more detail in the shadows, there is still the problem of too much brightness from the sky, compared to the amount of reflected light from the landscape. Polarizers help, but they are not the complete answer.
When using the A mode, remember that the camera’s electronic brain sees everything as 18 percent grey.
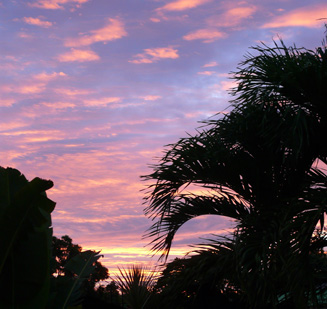
That said, if you are only taking pictures of clouds, try to use a polarizer most of the time. And because the exposure will be too low for the rest of the foreground, you will get a silhouette as per the first picture here this week, with the palm trees in silhouette. Unfortunately this page is in black and white so you will just have to imagine the red sky!
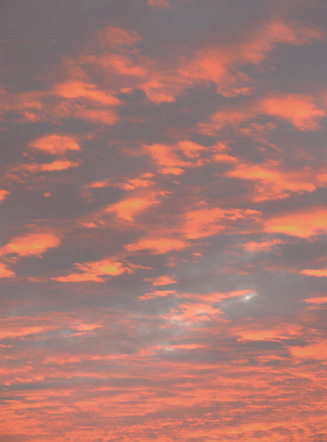
A photo of red clouds on their own is not so dramatic as ones with silhouetted foregrounds as you can see with the second photo this week.
Now, all this began because of an amazing red sunrises, but you don’t have to set your alarm for 5.30 and then sit there and hope. Clouds of all types make very interesting subjects, but if you want to incorporate a defined foreground with some cloud formations, it will be necessary to get yourself a filter that can help you with this. This is a graduated filter with a darker half and a clear half. This cuts down the amount of light from the sky to balance the foreground. These are made by many companies and come with a mount that the filter slips into. I use the Cokin system. Well worthwhile if you are serious about getting cloud shots.
You will have to try and experiment with a grad filter, but generally place the division between the darker half (at the top) and the clear half, along the horizon line. Try different shutter speeds and select the best options.
Once again this is the reason a young or inexperienced photographer should always carry a notebook and pen in the camera bag. Once you have the well exposed image you are looking for, with the exposure details in the book, you can always reproduce the shot. However, do bracket the exposure with half a stop either side of the expected readings.


