Very recently I made ‘color’ the subject of this column. Of course, it was only when I went to choose the photo to go with it that I remembered this article is on a black and white page of this newspaper. My preconceived idea that I could contrast a yellow door with a blue wall just went out the window.
Of course, since we discovered how to reproduce color photographically, we automatically use it, and if of the artistic bent will contrast one with another. And that is what brings me to this week’s article. In the black and white (actually black and grey) medium, just how do you contrast separate items, if they are all grey? How? You do it with shadows and composition.
Taking shadows first, it is shadow that gives two dimensional images the appearance of three dimensional (3D). Without shadow, any curved object looks flat (even Dolly Parton)!
The accepted definition of photography is “painting with light” as what you are doing is using light in all its directions and intensities to illuminate your subject, before you record it in electronic pixels. However, that is really only part of the art of photography. The other part is to paint with dark, which we call ‘shadow’.
Take a sphere, for example. If you blast the spherical subject with so much light that there is no shadow, the final result has no shape, no depth, no 3D effect and looks like a circle, not a ball.
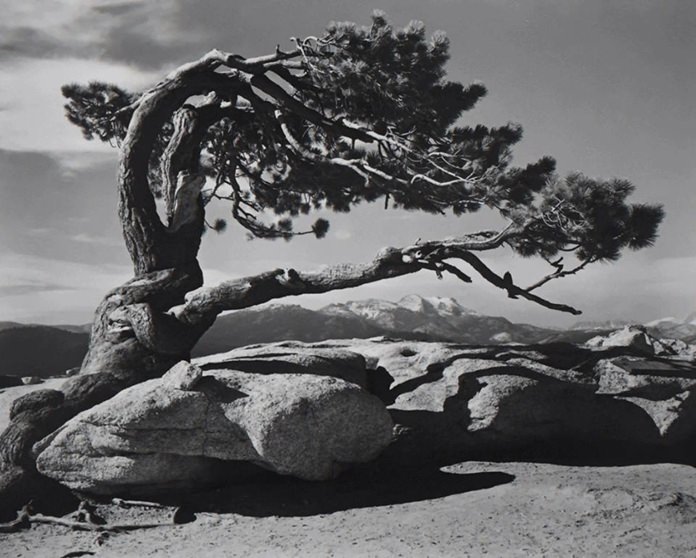
Take the outdoors situation, for example. We always suggest to the novices that they should photograph early in the morning or late in the afternoon. Do not shoot in the middle of the day. The reason for this is because in the early mornings and late afternoons the lighting (from the sun) is directional, skimming along the top of the earth’s surface, and makes for plenty of shadow. In the middle of the day, however, the sun is directly overhead and does not make for pleasant shadows, and even landscapes will look flat and featureless. Look at this famous landscape done by Ansel Adams and you will see what I mean. For a photographer, the middle of the day is purely for siestas, not for photography. It does mean that you get up at some dreadful early hours in the morning to drive to the location, but the end result is worth it.
Now to the most basic of composition rules. All good photographs follow the rules of good composition. The best known one of these is the Rule of Thirds, which by following, I guarantee will improve your final photographs.
Here is the Rule of Thirds to follow. Position the subject of the photo at the intersection of one third from the top or bottom of the viewfinder and one third in from the right or left side of the viewfinder.
By just placing your subject off-center immediately drags your shot out of the “ordinary” basket. Even just try putting the subjects off-center. While still on the Rule of Thirds, don’t have the horizon slap bang in the center of the picture either. Put it one third from the top or one third from the bottom. As a rough rule of thumb, if the sky is interesting put more of it in the picture, but if it is featureless blue or grey include less of it. Simple!
With some cameras where you can make a grid pattern on the viewing screen from the menu, which makes it even easier to position the subject. With the vertical lines, you will soon see if you have the subject vertical, and for horizontal subjects incorporating the horizon, you can also make sure it is level. You can actually draw the two vertical and two horizontal lines on the viewing screen with felt tip pen. It does improve the final shots, believe me. And what is more, this composition is something you can do in the camera as you take the shot. It does mean that you look critically through the viewfinder and position the subject correctly.
Now, that is not the only item you should think about with your photographs, though it is obviously a good start!

 |
 |
 |


