My first photography studio was painted white. Not externally, but internally. My next studio was painted black internally, and was a much better studio. Why? It all came back to the well-used phrase in photography “painting with light.”
Looking at the origins of the word “photography” it does indeed mean “painting with light’, but I would like you to think about the opposite – “painting with dark.”
In the initial stages of learning photography, the novice photographer is always looking for more light, but the biggest mistake is too much ‘light’, not too little.
With automatic flashes that pop up out of the camera, and others that come on as soon as the sensor decides it is getting too dark, it is difficult as a raw novice not to have shots that are very bright and absolutely bathed in light. Unfortunately, this is not the best way to show shape, form or evoke an air of mystery.
Undoubtedly the subject will now be well lit, but you have also removed shape and form from the photograph. You see, the way to convey shape is by showing the shadow the object casts. No shadow and it looks flat. Incorporate shadow and “Hey Presto!” you have invented 3D.
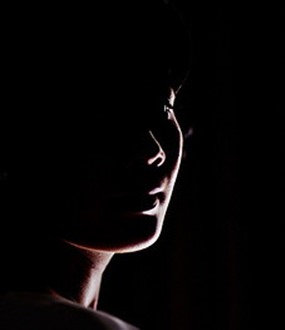
Shadow has another benefit – it gives an air of mystery to any picture. Dark shadows allow the viewer to imagine what is being hidden. Your photograph “hints” at something and the viewer’s mind does the rest from there.
Here is an exercise for this weekend. Let’s put some shadows into your photographs. Let’s do a portrait to incorporate shadow. And let’s do this indoors and without flash guns or any fancy equipment, and get a ‘professional’ look to the final print.
Find the largest window in your house or condominium and put a chair about one metre away from it. The chair should be parallel to the window, not facing it.
Place your sitter in the chair and position another chair facing the sitter. This one is yours, as you will take the photo sitting down. Reason? This way you keep the camera at the same level as your subject’s face and you will get a more pleasing portrait. If you photograph from a position below the subject you tend to give them “piggy” nostrils and it shortens the look of the nose. In a country where ‘big noses’ are considered desirable, this is not the effect wanted.
Now, make sure that your auto flash is turned off. This is important with point and shooters that can fire off as soon as light levels are lower than usual. Look through the viewfinder and position yourself so that the sitters face is almost filling the frame. Notice that the side of the face away from the window light source is now in shadow. If you have the ability to meter from the lit side of the face, then do so. But if not, just blast off a couple of frames on auto and let the camera do the worrying.
To change the brightness to darkness ratio is quite simple too. Use some black velvet close to the sitter’s face, on the side opposite the window. The black velvet absorbs the light that wraps around the face, emphasizing the shadow. Painting with ‘dark’ light!
You should also slightly angle the sitter’s chair so that one shoulder is closer to the camera and get the subject to turn their head to face the camera again. Try angling in both directions so you will get a choice of shots.
Another variation to try is to place a thin voile net over the window, or draw any transparent curtains. This will soften the light and is particularly effective when taking shots of women. Again go through the variations.
For a portrait study such as this it is worth taking many shots. Remember that you are not doing 20 identical shots – make variations in pose, lighting and exposure. There are also facial expressions to change – laughing, smiling, serious or sad. It is very easy to end up with 20 different shots. And as an added bonus, you will have some with an air of mystery. Try it this weekend.


