Portraiture is a very lucrative branch of photography. Get good at getting flattering portraits and you could even give up your day job. Whilst the professional studios have banks of diffused flash heads and rolls of background paper, you can get great portraits at home, with the minimal amount of equipment.
So this week let’s look at a few studio style tricks we might be able to adapt for the weekend photographer who does not have banks of studio lights and other such paraphernalia of the pro photographer.
To start with, let’s get the techno bits out of the way. You should choose a lens of around 100 mm focal length (135 mm is my preferred “portrait” lens) or set your zoom to around that focal length. If you are using a wide angle lens (anything numerically less than 50 mm), no matter what you do, the end result will be disappointing. That is of course unless you like making people look distorted with big noses!
The second important technical bit is to set your lens aperture to around f 5.6. At that aperture you will get the face in focus and the background will gently melt away – provided that you focus on the eyes!
Perhaps a word or two about focus here as it is very important in portraits. I like to use a split image focus screen and focus on the lower eyelid. This makes sure that the eyes will be exactly in focus. However, if you are using Autofocus (AF), then again you should make sure you focus on the eyes and use the ‘focus lock’ so you will not lose it.
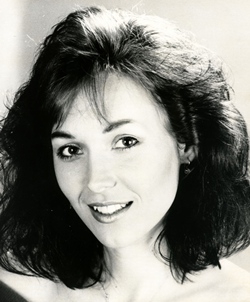
Next item is the general pose itself. Please, please, please do not have your subject sitting rigidly directly face on to the camera. This is not a passport/visa run photograph. It is to be a flattering portrait. Sit the subject in a chair some distance away from a neutral background, and turn the chair 45 degrees to the camera. Now when you want to take the shot you get the subject to turn their head slowly towards you and take the shot that way. You can also get a shot with them looking away from you. Nobody said the sitter has to actually look at the camera.
Now let’s get down to the most important part – the lighting. We need to do two things with our lighting. Firstly light the face and secondly light the hair. Now the average weekend photographer does not have studio lights and probably has an on-camera flash to work with. Not to worry, we can get over all this! The answer is a mirror and a large piece of black velvet.
Take the black velvet first. You will need a piece around 2 meters square and the idea is to place the velvet close to one side of the subject, but not actually in the photograph. You get as close as possible and the black will absorb much of the light and allow no reflection of light back onto that side of the subject’s face. Hang the velvet over a clothes drying stand or similar to make life easy for yourself.
Now the mirror. This device will give you the power of having a second light source for no cost! Now since you are firing light into the subject from the top of your camera, you position the mirror at about 30-45 degrees tilted downwards, placed behind and to the side of the subject, pointing basically at the sitters ear. The side you choose is the side opposite the black velvet. Again, you must make sure that the mirror is not in the viewfinder.
What you now have is a primary light source (the on-camera flash), a secondary light source lighting the hair and adding to the light on one side of the face, and a light absorber to give a gradation of light across the subject’s face. Take a look at the portrait this week. Note principal light, hair light and the model at 45 degrees to the camera.


