Everyone would like to take photographs that make the viewers go, “Wow! Wish I’d taken that.” Well it is not so hard, once you understand that all photographic images are not really 5×4, 5×7 or even 10×8.
The size you get back from your friendly photo shop is related in most instances, to the size of what a 35 mm negative used to be. The photographic printers are preset towards those sizes, and those sizes will suit the average weekend photographer. However, you are not the average weekend photographer, or you wouldn’t be reading this article.
The 5×4 print is very roughly of the same proportions as the 35 mm negative, so what you could see on the negative could be reproduced on the photographic paper. This is great in theory, but does not necessarily correspond to the subject you want to photograph. Not everything or everyone fits neatly into a 5×4 format.
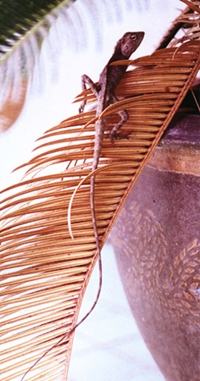
Take a look at the photograph this week. This is a long tailed lizard, taken by my keen amateur photographic friend the late Ernie Kuehnelt. This is a great shot and was one that Ernie had to use all his stealth to record. Lizards are not renowned for responding to exhortations to “keep still,” but he kept going until he got the shot, with the head framed nicely contrasted against the light background.
Now look again at the photograph. Long tailed lizards are not 5×4 or even 10×8 (same proportions obviously) or 6×6 or 6×7. When Ernie first brought the lizard pic into my office, he had cropped a little off both the sides to produce an elongated print. We sat and looked at it, but in the end we both decided it needed even more cropping to both sides to get the best from the photograph. We laid sheets of white paper down both sides, and suddenly the lizard became more and more powerful as the subject. The blank spaces either side had been taking the impact away from the subject. Cropping severely brought it out. So now Ernie was left with a long skinny print. Instead of 10×8 it was now more like a 10×4! But that did not matter, when you see the impact in the final print.
The moral to the tale (or the lizard’s tail) is that you should look very critically at some of your better shots, and then sit down with four sheets of paper and begin to look at how you could crop the shot, to give the subject more “oomph”. Pro shooters use two “L” shaped pieces of card, moving them around to find the best cropping situation, but four pieces of A4 printer paper are just as good.
To bring your prints into such that they will look good hanging on your wall, my suggestion is to get an 8R enlargement done (generally less than 100 baht in most photo processors) and then begin the visual cropping exercise as detailed above. Be bold, even cropping right close to hair lines, or even into the hair sometimes looks better. Don’t be afraid to crop into elbows when framing up portraits, for example. The idea is just to make the subject stand out.
When you have the best crop lines, then using a guillotine (most photo shops have these too), carefully finish the cropping exercise. It is this final print, no matter what proportions it ends up, that you should have framed and hung as wall art for your home or office. It should also be remembered that the frame requires careful consideration. It is no good to spend all this time on making the subject stand out, and then dwarfing it with a huge ornate gold frame! Don’t let the frame dominate the subject!
Since you are probably storing the images in your computer, crop these images before saving as well.
Do all this and then people will walk in and say, “Wow! I wish I’d taken that!” They will, believe me. The different shape is an immediate eye catcher, and with the subject matter now being the definite “hero”, you have that powerful head-turning shot you have always wanted.


