Are your photographs coming out grey? No really strong blacks or whites any more? Black cars turning out as grey cars? White cats turning into grey cats? Could be your whites are not balanced properly.
Now, I know that your fancy DSLR has a drop down menu that includes “white balance”. This is not something new or magically electronic, the principles involved in white balance have been the same since photography was invented.
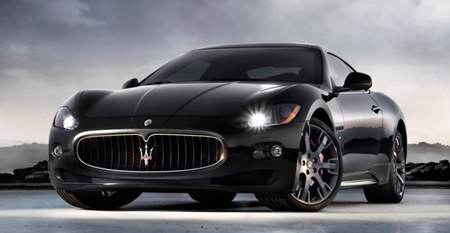
If you use an automatic camera (film or digital) set on A (for “amnesia”) then the chances are very high that you ended up with a grey car and a grey cat. Very highly likely. The reason for this is poor white balance, expressed as the magic photographic number known as 18 percent grey!
All photographers should become acquainted with the color known as 18 percent grey. Why? Because after you understand 18 percent grey, you have complete control over blacks and whites in your photographs – and by that, I mean in color photography, not just the black and white kind.
The really dedicated photo buffs will recognize 18 percent grey as being the cornerstone of the “Zone System” and the famed photographer Ansel Adams superb prints are trotted out with sage mutterings that if you understood the zone system, then your photos would look like his too. This is, of course, frog spawn. Ansel Adams spent many hours painstakingly printing his B&W work, specifically burning in some areas, holding back others and if you think he didn’t then think again.
However, here is the “short course” on the Zone System. What you have to remember at all times is just the simple fact that the meter in your camera is set to know what is 18 percent grey, and is programmed to produce as much 18 percent grey as possible. In other words, point the camera at your subject and the meter will work out a combination of shutter speed and aperture to give an exposure to get the whole shot as close to 18 percent grey as possible.
Back to digital photography. All digital cameras, straight from the box, are set to automatically correct white balance, but it doesn’t always work well. What part of the shot is actually white? One camera correspondent did not give up, he then used white balance lens caps and set the white balance manually. His manual results were a bit better, but still not good enough in tricky lighting situations (like tungsten illumination, for example). Then he used an 18 percent grey card to preset white balance and got the best results. The image using the grey card needed no post-camera color correction, and the colors were the most true to life. The grey cat really was a black cat!
So what to do? You can go into your digital camera’s menu and find the ‘white balance’ and then set it on pre-set or manual and focus the camera on an 18 percent grey card (very cheap at large photo shops) and snap away from there. The results should be better than those from the auto white balance.
The next step I recommend is to bracket your shots, giving different exposure settings, depending upon whether you are trying to photograph a white cat or a black cat. Remember that when you are photographing the white cat the exposure indicated by the camera is the one that will make the white color 18 percent grey. To get the color back to white it will need more light.
Let us imagine that your camera tells you that the exposure should be f 16 @ 1/60th of a second. You need more light in the camera, so make your exposure f 11 @ 1/60th and another at f 8 @ 1/60th. That gives you both one and two full stops of light more. One of those two will give you a white cat, irrespective of such fancy terms as automated multi-phasic metering, center weighted metering or whatever.
When photographing the black car, do the reverse. Put the camera in metered manual mode and then set the camera for one and two stops less light than indicated. It works!


