You want to take ‘glamor’ shots? Well better master the ‘Golden Glow’ first. And before getting the Golden Glow get some massage oil as well.
I am writing this with reference to Thai models, rather than European ones, which have their own quirks as well.
Please Support Pattaya Mail
Let’s use the massage oil first. This is used everywhere that is not covered by clothing, The oiled skin reflects light and increases the light to dark ratio, to give the model’s body a much more tactile sense.
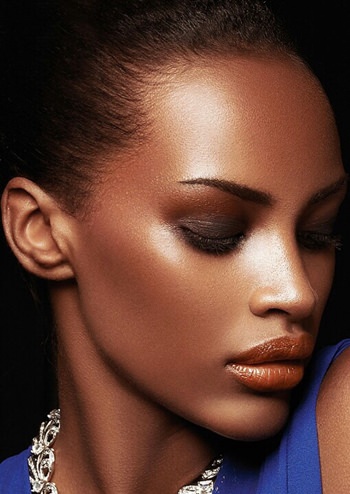
Now to get the Golden Glow, with the model positively ‘glowing’ with health and vitality and have you ever wondered whether people actually look like that? This is actually another photographic ‘trick’ but one that you can use to your own advantage. A trick that will cost you less than 100 baht for the equipment and three minutes to master.
The ‘golden glow’ that comes from the subject in the photo is really just reflected golden light, bounced back on to the subject. People shots benefit from this warm healthy look and when you use the technique properly, and the results can be spectacular.
Now in the photographic sense, the natural golden glow comes in the late afternoon, with the sun getting low on the horizon. There are good scientific reasons why this is so, but here is not the place to discuss them. Just accept the fact that late afternoon sun is the “warm” time. Take pictures at this time of day and you will get that golden glow – but our photographic trick will allow you to get that warm golden glow at any time of day – and control it as well, something you cannot do so easily with the sun as your light source! The celestial light technician can hide behind clouds at any time. And you will be able to produce this lighting even indoors.
What you have to do is build a light reflector that reflects that warm color. Go to the newsagent and get some gold foil paper. The sort of wrapping paper you use for wedding gifts. It may be embossed or patterned, and in fact it is better if it is, but must be gold in color. Glue the gold paper on to a sheet of cardboard or polystyrene sheet approximately one meter square. You do not have to be deathly accurate or neat. If the surface gets a little ‘scrunched up’ that is fine too. Your capital outlay is probably around 50-100 baht. Not bad, so far!
Now you have a reflector, which if you play with it near a window for example, will shine “gold” on to any subject. You are now ready to impart that golden glow.
The best photos for this exercise are people shots taken outdoors, with the sun behind the subject. This we call ‘back lit’. You will find that the subject’s hair becomes very bright around the edges, almost like a ‘halo’ effect.
Now for the addition of the golden glow. To do this, you position your reflector to shine some sunlight back towards the subject (that is why the sun should be behind the subject). Prop the reflector in the best position to give the degree of golden glow you want (I generally just prop it up with the camera bag, or you can get an assistant to hold it for you) and look through the viewfinder. See what a difference this makes? The ugly chin shadow has gone as the light is coming upwards, and the subject now looks brilliantly glowing and healthy. The one meter square reflector will also impart catch lights to eyes to make them sparkle as well. The end photo has shiny hair, bright eyes and a golden complexion radiating warmth. A fabulous glamor picture.
Now, the downside! It is more difficult to get the correct exposure setting in the backlit situation. If your camera has a Backlight button, then use it. If not, walk in close to the subject so that the persons face fills the frame, and take your exposure reading from there. Use the exposure lock, or just memorize the readings and put them in on manual mode. It is worth it.

 |
 |
 |


