All good photographs follow the rules of good composition. The best known one of these is the Rule of Thirds, which by following, I guarantee will improve your final photographs. Mind you, this rule does expect that you have moved close enough to your subject to fill the frame! Tiny people against vast expanses of background cannot be saved by any rule, other than the one that goes, “Walk several meters closer!”
But for those of you who are not aware of the Rule of Thirds, here it is. Position the subject of the photo at the intersection of one third from the top or bottom of the viewfinder and one third in from the right or left side of the viewfinder.
By just placing your subject off-center immediately drags your shot out of the “ordinary” basket. The technocrats called this the “Rule of Thirds”, but even just try putting the subjects off-center. While still on the Rule of Thirds, don’t have the horizon slap bang in the center of the picture either. Put it one third from the top or one third from the bottom. As a rough rule of thumb, if the sky is interesting put more of it in the picture, but if it is featureless blue or grey include less of it. Simple!
With some cameras where you can make a grid pattern on the viewing screen from the menu, such as on the DMC FZ series Lumix, it makes it even easier to position the subject. With the vertical lines, you will soon see if you have the subject vertical, and for horizontal subjects incorporating the horizon, you can also make sure it is level. With other cameras, you can actually draw the two vertical and two horizontal lines on the viewing screen with felt tip pen. It does improve the final shots, believe me. And what is more, this composition is something you can do in the camera as you take the shot. It does mean that you look critically through the viewfinder and position the subject correctly.
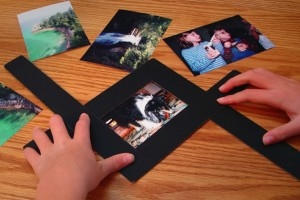
Now, that is not the only item you should think about with your photographs, though it is obviously a good start! The next item is cropping, where you get rid of non-important items from the final photo, by literally slicing them away. These are items which do not add anything to the photograph you have in your mind’s eye. This can be extraneous details, such as a rubbish bin, which never does anything for landscapes. There are two ways of doing this. One the old-fashioned, but easier to work with, and the other all electronic, but can take longer and is in some ways more clumsy. Hard to imagine, but hard copy is easy and quicker.
What you have to do is chop up some cardboard to give you two letters “L”. Place one on one side of the print and the other upside down on the other side. Now you can move the two letters “L” around to give you different areas of cropping. Very quickly you will see what combination is the most pleasing, and with a guillotine you can slice the unwanted areas from the print.
Of course, for those with post-production ‘edit suites’ or even a good Photoshop style program, you actually do just the same, but with electronics. Call up your print on the computer screen and with the cropping tools you can move them around until you feel you have the correct (most pleasing) crop. The problem comes that after doing this, you may find (usually find) that the crop is not quite what you wanted, so you have to call up the image and go through it all again. This is time consuming, whilst working with the two “L’s” and a physical print, you can explore all the various combinations more quickly.
So this week the messages were simple. Remember to fill the frame to give your photos more impact, so walk in closer. Remember to position the subject at the intersection of thirds, and learn how to crop for dramatic effect. That will improve your shots immeasurably.


