Photography is often called “painting with light”, and in many ways that is true. However, “Light” comes in many different colors. This is well understood by those in the optical world, and refraction through prisms will produce the different colors.
There is in fact a light scale, measured in degrees Kelvin, that shows why the late afternoon shots are ‘warm’ and the other shots are ‘cold’. The light scale also explains why a household light bulb looks orange when photographed, and why objects lit by neon tubes look green. This color shift is also true with digital cameras if you do not reset the white balance for the prevailing light source. Note that this holds true for video, as well as still photography.
Getting slightly technical, color “temperature” is a term that is borrowed from physics. However, the photographic color temperature is not exactly the same as the color temperature defined in physics, as photographic color temperature is measured only on the relative intensity of blue to red. However, we borrow the basic measurement scale from physics and we measure the photographic color temperature in degrees Kelvin (K).
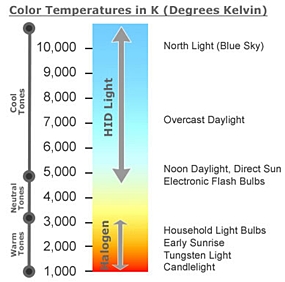
Here is a table to show the differences in light sources.
1000 K Candles; oil lamps
2000 K Low effect tungsten lamps
2500 K Household light bulbs
3000 K Studio lights, photo floods
4000 K Clear flashbulbs
5000 K Typical daylight; electronic flash
5500 K The sun at noon
6000 K Bright sunshine with clear sky
7000 K Slightly overcast sky
8000 K Hazy sky
9000 K Open shade on clear day
The next confusing aspect is that the photographic color rendition and the human eye do not see the colors with the same intensity. The usual camera colors are ‘balanced’ to around 5,000 K, so light sources lower in color temperature will look orange, even though it does not look orange to the naked eye. This is why tungsten light sources produce the orange hue. However, when you balance the color, the light is balanced against tungsten light by exposing it to a blue tinge, so this time the light bulb will look white.
You also do not have to know the degrees Kelvin table off by heart to get some different photographs when you turn the flash off. The main thing to remember is that the color you perceive via the naked eye, is not necessarily the color you will get in your photograph.
Try doing the following this weekend and let’s get some spectacular low-light photographs. Firstly, turn off the flash, but turn on the automatic mode for your camera. In other words I am going to make this very easy for you. No hard exposure calculations. If you have a tripod, dust it off, but even if you haven’t, continue with this weekend project.
Go to your local markets at dusk and take some photographs of what goes on there, using just the stall-holder’s naked bulb for illumination. Be prepared to lean against a telephone pole to stop camera shake if you do not have a tripod, but give it a go.
Another tip is to “bracket” the exposure, but you will have to take the camera out of the ‘Auto’ mode. You take one shot at where you believe the correct exposure to be (from the camera’s light meter), then one at half a stop more and another half a stop less. One of those three will give you the best shot.
Now try photographing some of our hotels at night. Most are quite brightly lit and once again, you may end up very surprised at what you get. Even try some portraits lit by candles only. Use your imagination, and not the flash!
You should also try photographing the same scene at several times during the day. Do not reset the color balance, but record the same scene at 6 a.m., 10 a.m., 2 p.m., 6 p.m. and even 8 p.m. You can mount these shots side by side as wall art and they will show the differences in the Kelvin degrees of light colors.
“Paint” your shots with your own “colors” and see the differences.


